
Next.js on DigitalOcean: Host Your App with Docker on a Cheap Server
Looking to host your Next.js app without burning cash or going through overly complex setups? This guide is exactly what you need. We’ll show you how to get your app live on a DigitalOcean Droplet using Docker and NGINX: fast, cheap, and clean.
Why Next.js + Docker + DigitalOcean?
If you’re an indie hacker, solo dev, or micro-SaaS founder, this stack hits the sweet spot:
- Next.js is ideal for building fast, modern apps.
- Docker makes deployment repeatable and easy.
- DigitalOcean gives you solid servers at indie-friendly prices.
Let’s get into it.
Step 1: Spin Up Your Droplet with Docker
First, you’ll need a DigitalOcean Account. Here you can get a USD 200 credit to start building: https://try.digitalocean.com/freetrialoffer
Once you are signed up and logged in, go to the DigitalOcean Docker Marketplace and launch a Droplet using the Docker on Ubuntu 22.04 LTS image. Just click on the Create Docker Droplet button.
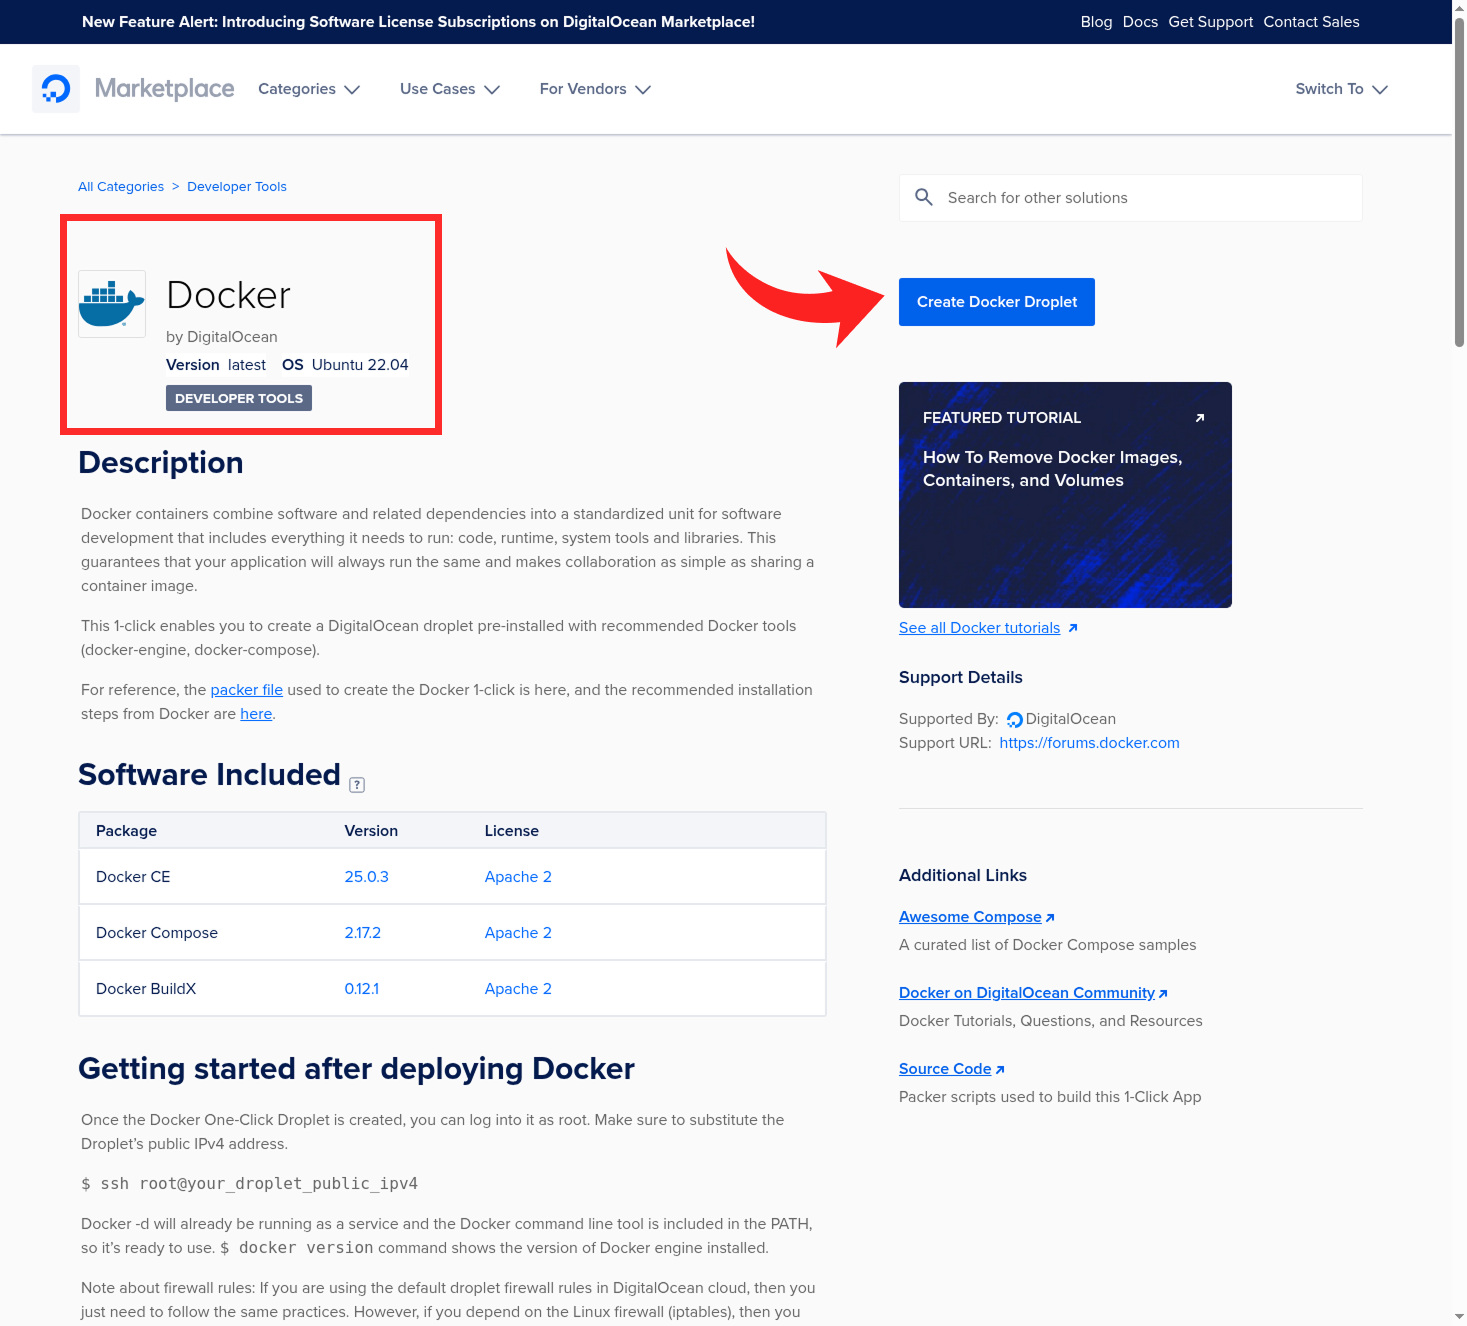
DigitalOcean has servers with Docker ready to use
This will take you to the page where you can configure and spin up your droplet. Here’s the setup:
- Choose a region. The recommendation here is to choose the nearest region to where your users are. This will improve speed with a low latency.
- Choose a small plan ($6/month is usually enough to start).
- Add your SSH key. If you don’t know how to create your SSH key, you can follow this tutorial
- Give a name to your droplet. You can use your app’s domain.
- Hit create. Done.
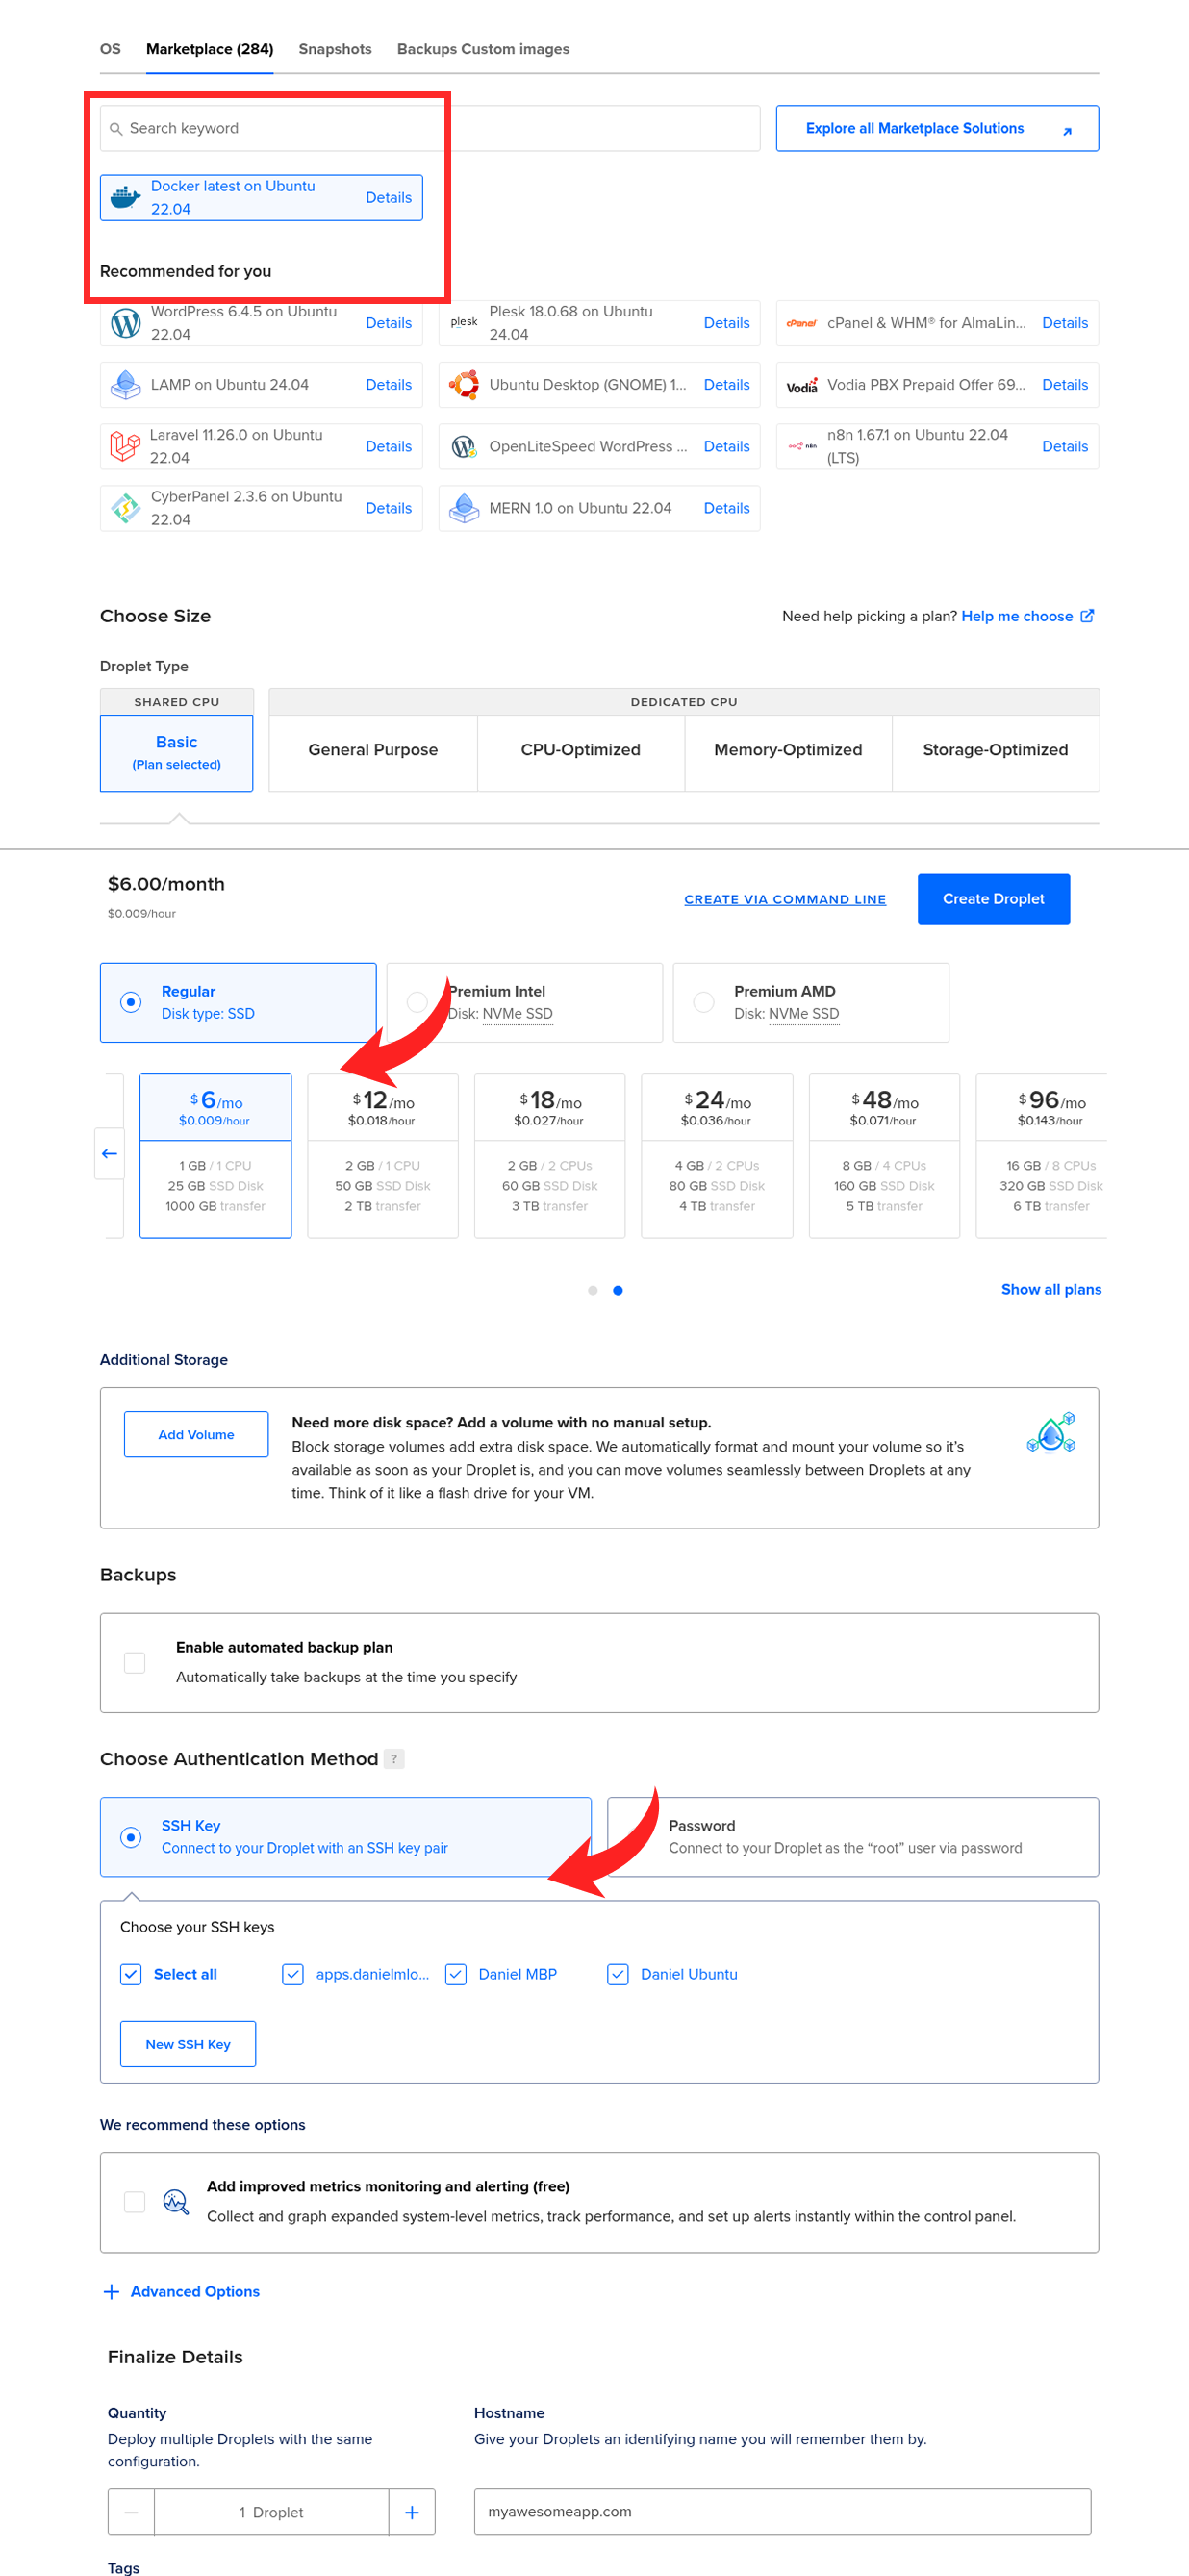
Configuring your Droplet with Ubuntu 24.04, selecting a plan, and adding your SSH key
Once it’s ready, SSH into your server:
ssh root@your_droplet_ipStep 1.1: Basic Server Hardening (Create user + disable root login)
To keep things secure, we are going to:
- Create a sudo user we’ll use to connect to your server
- Block SSH access for the root user
- Disable SSH access using a password. Only SSH key authentication will be allowed.
This will help keep our server secure.
First, create a new user with sudo privileges:
adduser yourusernameThis will prompt for a password. Make sure to write it down since you are going to need it to perform any administrative action on your server. It will also prompt for some basic information, you can just hit enter until done.
Next, add your user to the sudo and the docker group. Make sure to replace yourusername with your actual system user name you just created.
usermod -aG sudo yourusername
usermod -aG docker yourusername
Then open the SSH config file:
nano /etc/ssh/sshd_configLook for this line and change it to:
PermitRootLogin noAlso, this one, make sure to remove the # and change “yes” to “no”
PasswordAuthentication yesSave and restart SSH:
systemctl restart sshThen we need to allow access to your new user via SSH from your computer. For this, your are going to need your public SSH key, the same one you added to DigitalOcean. Make sure to replace yourusername with your actual system user name you just created.
mkdir /home/yourusername/.ssh && cp .ssh/authorized_keys /home/yourusername/.ssh && chown -R daniel /home/yourusername/.sshFrom now on, log in using the new user. First exit from your server and log in with your new user:
exit
ssh yourusername@your_droplet_ip
Step 2: Install NGINX
We’re using NGINX as a reverse proxy to serve your app and handle SSL.
sudo apt update && sudo apt install -y nginxAfter installation, make sure it’s running:
sudo systemctl enable nginx
sudo systemctl start nginx
Step 3: Set Up Your Next.js App with Docker
In your project folder, create a Dockerfile:
FROM node:18-alpine AS base

# Install dependencies only when needed
FROM base AS deps
RUN apk add --no-cache libc6-compat
WORKDIR /app

# Install dependencies based on the preferred package manager
COPY package.json yarn.lock* package-lock.json* pnpm-lock.yaml* ./
RUN \
    if [ -f yarn.lock ]; then yarn --frozen-lockfile; \
    elif [ -f package-lock.json ]; then npm ci; \
    elif [ -f pnpm-lock.yaml ]; then yarn global add pnpm && pnpm i --frozen-lockfile; \
    else echo "Lockfile not found." && exit 1; \
    fi


# Rebuild the source code only when needed
FROM base AS builder
WORKDIR /app
COPY --from=deps /app/node_modules ./node_modules
COPY . .

# Next.js collects completely anonymous telemetry data about general usage.
# Learn more here: https://nextjs.org/telemetry
# Uncomment the following line in case you want to disable telemetry during the build.
# ENV NEXT_TELEMETRY_DISABLED 1

# ENV VARIABLES.

# Copy .env file if any

# COPY ${env_file} .env.production

# Here you can define any ENV variable needed in build time:

ENV SOME_ENV_VAR true

# If you want to pass them as args on build time, declare them as arguments and then pass those to the variable

# ARG debug
# ENV NEXT_PUBLIC_DEBUG ${debug}


RUN yarn build

# If using npm comment out above and use below instead
# RUN npm run build

# Production image, copy all the files and run next
FROM base AS runner
WORKDIR /app

# Here you can define any ENV variable needed in execution time:

ENV SOME_ENV_VAR true

# If you want to pass them as args on build time, declare them as arguments and then pass those to the variable

# ARG debug
# ENV NEXT_PUBLIC_DEBUG ${debug}

# Uncomment the following line in case you want to disable telemetry during runtime.
# ENV NEXT_TELEMETRY_DISABLED 1

RUN addgroup --system --gid 1001 nodejs
RUN adduser --system --uid 1001 nextjs

COPY --from=builder /app/public ./public

# Set the correct permission for prerender cache
RUN mkdir .next
RUN chown nextjs:nodejs .next

# Automatically leverage output traces to reduce image size
# https://nextjs.org/docs/advanced-features/output-file-tracing
COPY --from=builder --chown=nextjs:nodejs /app/.next/standalone ./
COPY --from=builder --chown=nextjs:nodejs /app/.next/static ./.next/static

RUN chown -R nextjs:nodejs /app

USER nextjs

EXPOSE 3000

ENV PORT 3000
# set hostname to localhost
ENV HOSTNAME "0.0.0.0"

# server.js is created by next build from the standalone output
# https://nextjs.org/docs/pages/api-reference/next-config-js/output
CMD ["node", "server.js"]
Now create a docker-compose.yml file:
version: '3.8'
services:
  app:
    build: .
    ports:
      - "3000:3000"
    restart: always
Clone, build, and run your app:
git clone [email protected]:yourgithubusername/yourrepo.git
cd yourrepo && docker compose up -d
Note: Make sure to add your server’s public SSH key to your Githug/Gitlab account or custom Git Server. You can use the same procedure to generate a SSH key for your server as you did for your computer.
Your app will now be running at http://your_droplet_ip:3000
Step 4: Configure NGINX as a Reverse Proxy
Create a config file for your app:
sudo nano /etc/nginx/sites-available/yourappPaste this inside. Make sure to replace yourappdomain.com with your production domain.
server {
    server_name yourappdomain.com;


    # If you are serving user-generated static content, declare it here:
   # location /images/ {
   #     alias /home/staging/citas_staging/images/;
   #     autoindex on;
   # }

    location / {
        proxy_pass http://localhost:3000;
        proxy_http_version 1.1;
        proxy_set_header Upgrade $http_upgrade;
        proxy_set_header Connection 'upgrade';
        proxy_set_header Host $host;
        proxy_cache_bypass $http_upgrade;
    }

}
Enable the config:
ln -s /etc/nginx/sites-available/yourapp /etc/nginx/sites-enabled/
nginx -t && systemctl reload nginx
Step 5: Add SSL with Certbot
Before this step, make sure your domain is pointing to your server’s IP via DNS.
Then install Certbot:
sudo apt install -y certbot python3-certbot-nginxRun Certbot to auto-configure HTTPS. Make sure to replace yourdomain.com with your actual domain. Also, you need to point your A zone to your server IP in your DNS Zones.
sudo certbot --nginx -d yourdomain.comFollow the prompts and you’ll have a secure app with SSL in seconds.
Bonus: Monitor Your App with PingCat 🐱
Don’t leave your app flying blind. Use PingCat to get instant downtime and SSL alerts. It’s free, dead simple, and made for projects like yours.
Wrap-Up
You now have a Next.js app running in Docker, served via NGINX, secured with SSL, and locked down with a proper user setup, all on a cheap DigitalOcean server. Add PingCat and you’ve got a production-ready stack that just works.
